Pages

Showing posts with label craft. Show all posts

Thursday, March 15, 2012

My new love...Pinterest!


I've been hearing all this hype about 'Pinterest' over the past year and a few months back  It seemed like my kind of thing...some described it as "Pinterest lets you organize and share all the beautiful things you find on the web. People use pinboards to plan their weddings, decorate their homes, and organize their favorite recipes." and "Pinterest is an online forum for creativity. Users can create inspiration boards that link directly to the source of each project/recipe/photo etc. They can follow someone else’s boards, whose tastes and interests they admire. And there is space to open a discourse about what is pinned via comments and “likes”. 
I read more about it HERE
Creative, inspirational, arty...this sounds like my kinda thing!!
 I signed up for an invite (yes, you need an invite...for some reason you cant just join??)  (you can find me In this link) Once I got my invite Imust admit I was a little confused/overwhelemed by it.
I went off it for a few weeks and discovered a blog raving about it.  So I got back onto it and gave it another shot.  Ok, after spending a couple of hours 'playing' last night and I was pleasantly suprised.  Ithink Im now 'in love'...IGET IT!
You can get onto this site and click on a pic, save it and then it takes you to the place it came from (i.e if its a tutorial on DIY for example).
Pics like these...


It is just fabulouse and I am worried I may be just a bit addicted now....eek.

Photobucket

Monday, January 16, 2012

I've been wanting to blog about this for quite some time but I've had issues with uploading pics, for some reason.  Anyway, after a looooooong process I was able to download some pics tonight {apologies for the sideways poics...not sure what happened there as Ive turned them}.
At the start of last school term My husband and I told Little T that if he tried his hardest at school we would throw a party for him in the summer holidays.
We'll im happy to say he did exceptionally well the last term of school so he got his party.
He thought of a 'dinosaur' theme as he & his little mate Jay, is totally into them at the moment.  Its so cute.
So we picked a date, made a list of names and got organising.
I looked up paperandcake.com and it was a total life saver.  I downloaded, printed and cut and pasted EvErYtHiNg!!!!
It saved me a ton load. 


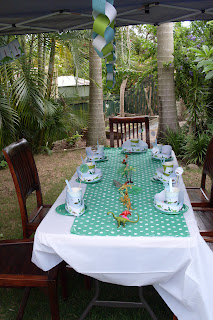
We used all of lil' T's dinosaurs as table decorations.
I also had a strip of green and white spot fabric that I hadnt used yet sitting in my sewing box.  I decided this would be perfect for the table runner with all the little dinosaurs standing on it.

Both the kids helped by making the chain draped above the table.
Great job, I think!


I did it all so cheap.  I made 90% of it all.  The cups i purchased from Ikea at .99c for a pack of 10 and I wrapped the dino logo around the cups.  I even made the personalised hats.
Yummmmmm....Homemade dino pizzas, nuggets and sanwhiches, as well as dino rocks {meatballs} and Lava sauce {tomato} and mud sauce {B.B.Q}

Dessert: chocolate cupcakes with dino toppers {also printed out on the computer}

Homemade popcorn {with home made popcorn cup}
When the fun & games were all over everyone went home with a fun party bag and a bag of 'dino skeleton' cookies....


We had loads of fun and so happy we did it.  it was great hanging with 'the boys' for the day ♥


Photobucket

Monday, September 27, 2010

My fab new DIY lamp.

I have been reading alot about recovering and renovating lamps lately On blogs like this  and I realy wanted to give this a try.
Firstly, I had this beautiful piece of wood that I found at the tipshop. It was solid wood and I think it may of once been a leg off a small table. I had been using it outside with candles on top and it looked lovely however I felt it was wasted and it wasnt realy working outside.
I decided to paint it white and slightly rub it back. Im kicking myself that I didnt take any before/after shots of this.  My vey clever husband drilled holes in the base to put my lamp cords.

Secondly, I found an old lampshade at an op-shop that wasnt the prettiest,In fact it was quite blah!... but it was the perfect shape for what I was wanting.


 The fabric peeled off the base quite easy, as you can see.

I totaly took the lampshade apart and was left with a skeleton.  I used the backing cardboard as a template for my fabric.

I had some nice fabric that I purchased from Ikea a while back that I measured to fit the cardboard.  Note; if you decided to make this, make sure the fabric is slightlly bigger around the edges of the cardboard.

I sprayed adhesive glue on both the cardboard and the fabric and then very carfully layed the two together so they were neatly on top of each other.
Now, for the fun {but tricky} part.  I wrapped the shade around the two metal rings that form the shade, I sprayed a little more of the adhesive and tucked the fabric under the rim neatly so you cant see it.

Sticking pegs around the shade until it dries just keeps eveything in place.

Not the greatest of pics {sorry} but here is the finished product.  You can see the lampbase and shade all in one here.

I did a simular shade, in hessian...it wasnt the best result, but Im determand to give it another go and perfect it LOL.

Sorry this wasnt the best tutorial, but check out this FaNtAsTiC tutorial here
that helped me with my lamp.

~Have fun xo