It is quite a fiddly thing, but like anything, I think the more you do it the easier it becomes.
In this Blog post I am going to give a step by step guide to making sushi...the simple mums way...
1.I placed 2 cups of rice (Jasmine) in a sieve and rinsed it untill the water ran clear....For some reason this makes the rice stickier. Next I put the rice in my rice cooker with 2 cups of water. I let it do its thing. The rice needs to be cooked through the absorb method and I find a rice cooker does this to perfection. When the rice is done try not to 'squash' or flatten the grains of rice.
2.Once the rice i cooked, I placed it in a glass dish...My trusty ol' Pirex dih worked perfect. I spred it out evenly.
3. Next once done, I used 1/2 cup of sushi seasoning which I purchased form an asian store. This adds the right amount of flavour to the rice...Not to vinigary, not too sweet...Just right. It also adds the rice stick together which i the key to sushi. Please remember that when you are mixing the seasoning through to use a Plastic or sillican spatula as metal tends to alter the taste. Also, be careful once again not to flatten the grains of rice. Be VERY gentle and sort of 'fluff' the rice till the seasoning is mixed through. Let sit untill fully cool.
4. Once the rice is cool your ready to start putting your sushi together. I gathered my ingredients...
*Nori (seaweed) sheets
* Kewpie - Japanese mayonaise
*Tin of tuna
*Cucumber slices
*Sweet chili sauce
You can baisicaly put ANYTHING in your sushi...I just know my kids WILL eat tuna. For my husband I also put avocado and/or garlic chives just for extra flavour.
OH, and I almost forgot...
* a bamboo sushi rolling mat.
Most of these items can be found in the supermarket OR for more choice an asian supermarket.
Mix the tuna, mayo and sweet chili together in a bowl.
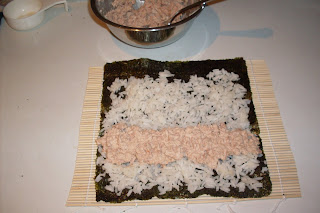
5. Now this can be the tricky part...which way to lay it all. Ok, Lay your Nori out shiny side up (yes...there is a shiny side believe it or not). Lay a handfull of rice(use your hands...get em' dirty...its the best way so as not to squish the rice) on the nori. Gently ped it out right to the edges, leaving the top part bare, as in the picture. Make sure it isnt too much rice or it will get messy. LOL
Next Lay the tuna (or what ever filling you choose in a thin layer on top of the rice.
6. This is where it gets fiddly. Gently roll away from you, but at the same time firm grip so it all sticks together. Then ever so gently, wrap the end strip, without the rice up to seal the sushi roll. Hold it firm for a minuit. It should also have a slight square shape to it.
7. Now once your roll is made gently pull away the bamboo mat. Get yourelf a REALY, REALY sharp, non seratted knife. Wipe a little of the sushi seasoning on it as it will prevent the Nori sticking to it.
Slice the roll in half. Then in half again. Then again.
You hould be left with 8 small rounds. Wipe the knife blade regulary.
8. Now all you have to do is plate it up and eat up. I served mine with Soy sauce and strips of Garlic chives. Wasabi as delicouse too.
Not bad for a first attempt, I must say.
A great plate to take to someones house, lunch for when the girls come over, or even as a snack.
My kids took it to school today for lunch as well as my husband. All came home raving about their scrummy lunch. And, the best part....its healthy too!
WOOPWOOP!


.png)


hOKcgkw~~60_12.jpg)


I love sushi :)
ReplyDeleteMy favourite is chicken and avocado... Superman loves anything with beef in it :)
Great when I am lazy. And makes me think I've done something special!!
Because there is only two of us, I freeze the leftover sushi rice and defrost when needed. I freeze in portions enough for 2 rolls.
Handy!